If you have looked at my initial page on receiving the Automatic Dependent Surveillance – Broadcast (ADS-B) system using FlightAware likely you are looking at this page to improve your setup even more or perhaps add features.
Here, amongst possibly other things, I will show you:
- How to add and view UAT 978MHz receiver capability
- Editing your /boot/piaware-config.txt toenable some features
- Recover from an SD-Card Failure and keep your existing site ID
Also, there are a few settings I think everyone should set which may not be default as well as commands I found useful I wanted to share. Basically, when all done this is (Below) what your dashboard will display. Your Sync numbers will vary of course.

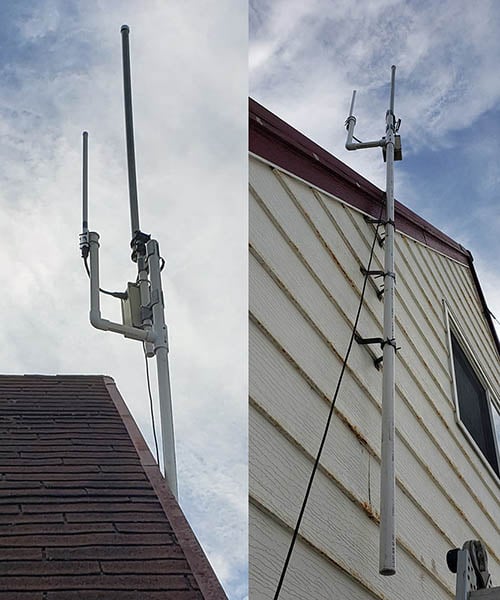
You will, of course, need the hardware, above is my modification completed on the roof, below is what I needed and the closeup of my POE (Power Over Ethernet) powered RaspberryPi setup.
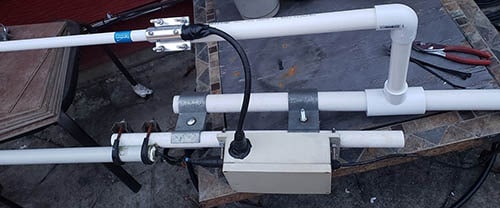
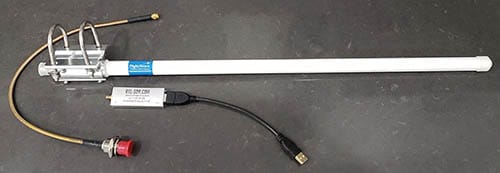
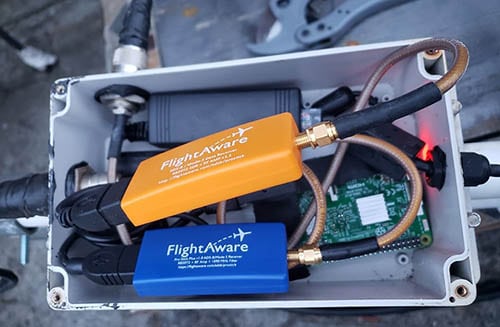
Basically 1" PVC used to mount the 978MHz Antenna to the existing setup. The extra hole on the side to connect the "N" Connector and a short jumper cable to the antenna. Below is the parts list, I ended up switching the RTL-SDR USB stick for the Yellow Flightware one. Why the Yellow? The blue has the 1090MHz filter, you do not want this for trying to receive frequencies below. Both Blue and Yellow models have a preamp.
Both receivers side by side. Plenty of power to run both and works great! Make double sure the care is watertight. Use low loss coax and keep connections as short as possible. I also use short USB extensions to make things easier to fit and also reduce stress on components and not have to plug the SDR receivers into the RaspberryPi directly.
First, you will need to edit your piaware-config.txt file. You will need to SSH into your RaspberryPi. From a Linux machine or a Mac this is easy from the terminal. On a PC I recommend downloading and using Putty. Figure out your local IP address and simply connect. Enter username Pi and password (Default is Flightware and you should change this). Next, enter the following:
sudo nano /boot/piaware-config.txt
Add these two lines on the very bottom:
uat-receiver-type sdr
uat-sdr-gain max
TIP: While you are at it, make sure auto-update is enabled as well as make any other changes you want to, just be sure to read up on them and make a note in case you need to reverse it. You can find the advanced configuration settings here: https://flightaware.com/adsb/piaware/advanced_configuration for sure I would set MLAT as well as allowing MLAT to sync.
Hit control X and the "y" for yes and enter to save back to the same file.
sudo reboot
Give it a few seconds and you will see UAT 978MHz added. You will have to access it on a different screen. So let's say your local IP is 192.168.1.67 then you will find it at: http://192.168.1.67/skyaware978/alternatively the ADB-S 1090MHz page is http://192.168.1.67:8080
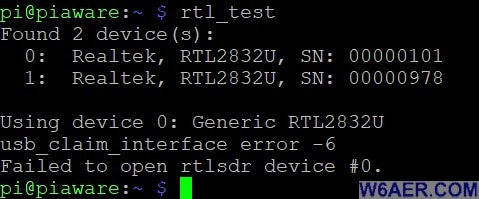
This is basically it for most users. Although you may find that the order of the receivers is wrong and your detected flights have dropped or ever stopped. the ADB-S is Receiver 0 and the UAT is the second receiver, receiver 1. If this is flipped you will need to edit the serials possibly. You can check this with the rtl_test command. In my case, both had serial number 00001000 and they were flipped consistently. Start by going in via SSH as before and installing it:
sudo apt-get update
sudo apt-get install rtl-sdr
 Use the rtl_test command to get a list of USB RTL devices. This will start with 0 for the first one and 1 for the second one. The images on the right enlarge if you click them so you see what it is supposed to look like.
To stop the services so you are allowed to make changes to the serial, do the following:
sudo systemctl stop dump1090-fa
You MAY need to repeat the above, sometimes it does not take the first time I noticed, not sure why but make sure you do not get an error msg. If you get on saying service is not loaded for the above then you are likely using something other then FlightAware. In this case, you will need to try:
sudo systemctl stop dump1090 or possibly
sudo systemctl stop dump1090-mutability
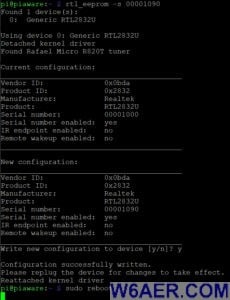
Once you have stopped all services and ONLY have the USB device plugged in for which the serial is to be changed, use the following command:
rtl_eeprom -s 00001090if you want to base it on the frequency or
rtl_eeprom -s 00000101if you want it in order
Be sure to hit "y" for yes for changes to take effect.
sudo reboot
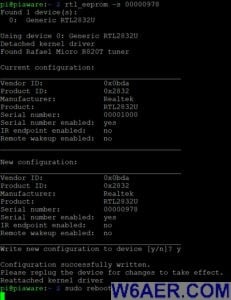 Repeat the above steps (reboot, check device, stop services) and this time with the 2nd USB stick ONLY plugged in:
rtl_eeprom -s 00000978 if you want to base it on the frequency or
rtl_eeprom -s 00000102if you want it in order, similarly to above
Again, hit "y" for yes.
Sudo reboot and give it about 30 seconds. Check if the order is now correct. If you did it as above, you should be ready to roll.
TIP:If you have ever been in a situation like me, where you had to rebuild your RaspberryPi FlightAware receiver but did not want to lose your historical data and have to start over with a new account then I have just the answer.
It again comes back to editing the /boot/piaware-config.txt file as above.
Simply grab your site ID from your existing page and add this string to the above file using the feeder-id tag. So you will add exactly one line of code. Then sudo reboot and within a few minutes, you will see your old feeder profile being updated. That is all there is to it.
In addition to this website of course, here are some other great places to find more information on the Raspberry Pi and related items:
- AdaFruit
- List of Ham Radio Applications for the RaspberryPi
- MagPi Magazine with a tone of great information
- ModMyPi
- Raspberrypi.org The Official site
- Raspberry Connect
- FlightAware PiAware setup instructions
- NooElec Store for alternative SDRs
- SparkFun
Please be sure to bookmark them as well as bookmark W6AER.COM if you find it useful!
For more information:
- FlightAware PiAware setup instructions
- RaspberryPI offical website
- NooElec Store for alternative SDRs
If you find something incorrect and/or have an update, I would really appreciate if you could let me know by contacting me. I like to keep things as up-to-date as possible. Thank you! - Lucas / W6AER


