
This project involves receiving the Automatic Dependent Surveillance – Broadcast (ADS-B) system used by airplanes to report their position and other relevant information using a RaspberryPi and a USB SDR receiver. This in turn gets sent to FlightAware which provides a free account to users/reporters (requires account setup) as well as runs a local web server which allows one to monitor their local air traffic. I live very close to San Francisco International Airport (SFO) so this was a real fun one for me.
Below is an example of what you will end up with displayed on your RaspberryPi via your browser, more information on this later in this write-up. I regularly receive outside of 250NM (Nautical Mile - see image below) and here is how I did it described further below.

Here is a close-up with trails on showing the local air traffic. A lot busier then one might think! Colors indicate elevation (key is on the bottom) and the black dot is my QTH (location) for the receiver.

Before I move on, let me clear up some of the other terminology. MLAT is Multilateration and is used in conjunction with ADB-S for accuracy. This is done in the software and is sort of a 2 for 1 in this case. It was developed for military purposes originally and it uses a method known as Time Difference of Arrival (TDOA). This is great for aircraft that do not provide other data. This is then queried via FlightAware and information can be pulled up with a click as demonstrated below.

This is what you will end up with as far as the hardware goes to accomplish the above. Left side is finished product the right side is with the USB SDR dongle removed for a better view. The casing from the receiver was removed for better cooling since it is in a tight box. Make sure no metal touches. As of 2018 it was been running 24x7 for 2+ years with ZERO issues!
What is Required:
- RaspberryPi 3 (or supported model)
- SD Card for the software (8Gb or more)
- 5V Power Supply for RaspberryPi (Pictured Below)
- 1090MHz Antenna (build or buy)
- USB SDR Stick Capable of 1090MHz (more on this later)

Additonally required for the way I setup the unit:
- Power Over Ethernet (POE) injector
- Heatsink kit for the RaspberryPi (Above you see them installed)
- Watertight project box (Hardware store)
- 50ft Ethernet cable (UV resistant, will be outside)

The next step is to pick your SDR. There are two flavors if you will form FlightAware, yellow is the older one with no filters, blue is the newer one with built in filter and a few other alterations. Most notable is the lack of the large LED. I took this picture with both open so you can see the differences. I have used both, when I first did the project I used the original yellow, I since then switched.

Alternatively you can use one not from FlightAware. Here are two versions from NooElec as an example, they do a good job with theirs. Top is the more expensive frequency stable version and below is the cheaper version, note the crystal sizes. You can still tell they both have the IR receiver (under LED on the far left) as a reminder that these were originally designed for Digital TV reception in Europe.

As I had mentioned, I originally selected the original (Yellow Case) FlightAware SDR since that is what was available. Since then I have switched to the newer (Blue Case) unit, which has a better built in filter. I gained another 50NM (Nautical Mile) in reception range.

The actual connection and configuration instructions are on the FlighAware website and are subject to slight changes so I am not going to repeat them here but please visit: flightaware.com/adsb/piaware build for more details and once ready here is the Software Installation instructions at: flightaware.com/adsb/piaware/install
However I will cover here what I did differently and why I did do. I experimented a lot with ADS-B and noticed there was a lot of loss when cable long between antenna and receiver. 1090MHz after-all and so not a big shock, even if I used cable designed for long run WiFi (2.4GHz rated, 1/2" cable) still not as good as connecting it up with a very short run even with poor cable.
I figured I do not need to have the Pi sitting next to me, I remote into it all the time anyway, no monitor was ever used. But I did not want to run extra power up there. So I decided to install it using ONE cable, simple cat5 Ethernet cable and use POE, Power over Ethernet on it. Working in IT, I was quite familiar with this. All the processing is done in this enclosure, data out, power in. Very simple! Cable from the antenna to receiver is under a foot so practically zero loss. I think you can see my results above, it works quite well.

I did however need to make sure it was all water tight! I used coax seal to do the job. This is the stuff I go through like rolls of being a ham and always playing with antennas so I knew it works well. Pictures below on how and where I used this. Same thing on the Ethernet end, where I drilled a hole just large enough to fish it through and terminated it it to make sure no water ever gets in. One in (N plug for antenna) and one out (Ethernet for data and power) can not make it any more simple. Simple is good, less likely to fail.
Since I do not run the DC adapter inside the box, it is actually quite cool in there. The heatsinks are just a precaution for the RaspberryPi. Even on days when it was 90F here (not often since I am near water) it was working just fine.
As for antennas I have had, 3 versions. One I made and worked OK, the other 2 I had purchased and both are the FlightAware approved ones. This is the higher gain version you see here but for the most part they are all pretty close. Here is the final project as it looks from the outside:

Here is an additional view from the software (running via web browser/website) as a plane is heading right over my QTH. Lots of fun but herhaps the most fun I had was building it and trying to get better performance. This also gave me some skills I could apply towards antennas when dealing with ham radio and of course vice versa.

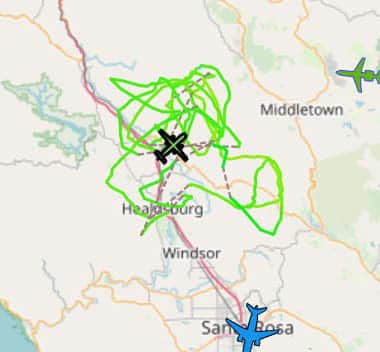 Sonoma County, CA - Firefighting in action
Firefighting planes and helicopters checking for hotspots during the massive Sonoma county fires in 2019. Please see some of my screen captures below with trailing enabled on the FlightAware tracker.


In addition to this website of course, here are some other great places to find more information on the Raspberry Pi and related items:
- AdaFruit
- List of Ham Radio Applications for the RaspberryPi
- MagPi Magazine with a tone of great information
- ModMyPi
- Raspberrypi.org The Official site
- Raspberry Connect
- FlightAware PiAware setup instructions
- NooElec Store for alternative SDRs
- SparkFun
Please be sure to bookmark them as well as bookmark W6AER.COM if you find it useful!
If you find something incorrect and/or have an update, I would really appreciate if you could let me know by contacting me. I like to keep things as up-to-date as possible. Thank you! - Lucas / W6AER