If you are a ham radio operator, maker, techie or all of the above, you may have heard about the raspberry pi. But perhaps you were not aware how well it fits into a Ham Shack. It can be used to:
- Decode ADS-B and MLAT data from Airplanes, Helicopters even Balloons
- Decode AIS Marine Traffic from Boats, Ships, etc. (External Link)
- Decode Digital modes with WSJT-X (FT8, JT65, JT9, WSPR, MSK144)
- Receive Weather Satellite images:
- Function as an iGate for APRS (Automatic Packet Reporting System)
- Transmit WSPR with simple add-on Hardware
- Run GNU Radio and SDR (Software Defined Radio)
- Ham Clock - Greyline, Satellite Tracking and more (External Link)
- Create hot spots for DMR, Yaesu Fusion C4FM and D-Star systems
- You can even add a large Nextion screen to it
- Even use an everyday ham shack desktop computer with many ham radio oriented software being added all the time
- And much, much more!
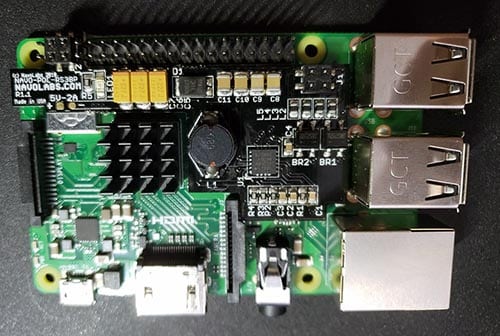
Pictured above is a RPi 3 with a POE (Power over Ethernet) Adapter. Allows the DC to come to the unit via the Ethernet cable for remote installations. This unit also has an optional heatsink installed over the CPU. I do highly recommend this!
If you are new to the Raspberry pi or just want to expand your knowledge a little, hopefully the following information will help.
So WHAT is a Raspberry Pi?
There are a few different varieties of the Raspberry Pi available on the market (Model versions are in parenthesis):
- Pi 1 (A,B,A+ and B+) - Older models circa 2012 or so, obsolete 700MHz CPU
- Pi 2 (B) - 2015 version, still very usable, GPIO moved to 40 GPIO, 900MHz CPU
- Pi 3(A+, B, and B+) 2016-2018, faster version of the above, 1.2-1.4GHz
- Pi 4 (B) - 2019 model, the latest currently, 1.5GHz CPU, memory size options, USB 3
- Zero (including W) - W means wireless, these are stripped down units for use where some features are not needed 2015-2017
None of these are over $35-40 USD in price. The B3+ unit is a quad-core 1.4GHz with 1GB ram and networking capability. I recommend using this unit at this point in time for most users. The version 4 unit is available in 3 different memory sizes, 1,2 and 4GB as of 2019. A nice comparison chart can be found here on the Modmypi website.
Above is the Raspberry Pi ZERO V1.3 in this case. Top and Bottom are shown. This is smaller, stripped-down version of the big brother(s) but by no means any less fun. Sometimes you do not need all the extra USB connectors and extras the others come with and size is an issue sometimes. This is perfect for those situations!
What is needed to get one up and running:
- 5V power source - Can be USB like ones used for phones, 2A or better
- Good quality SD card - at least 4Gb, but under 32Gb - Class 10 is recommended
- An Operating system - which I will provide links for
Nice to have:
- Powered USB hub - Likely you may need to plug in more then is allowed on device but depends on your intended usage. Powered is a key word here.
- Case - Here you will have many options although for Ham Radio use I recommend a metal enclosure.
- POE Adapter if you want to power and network via one cable. I used these for many of my projects you will find on this website.
- Other accessories if needed - Such as Mouse, Keyboard, Monitor, Ethernet cable, etc.
To Install the Operating system you will need to pick an operating system. The ones currently available are:
You can Download them all here. There are some other flavors aroound, some you will see listed on the Raspberry.org website. I will not be dealing with these in this section.
You will also need to write the image to the SD card.
- For PC Users (Windows 7 and up): SD Memory Card Formatter or you can use BalenaEtcher as well.
- For MacIntosh Users (MacOS X 10.7 and up): SD Memory Card Formatter
- For Linux Users: GParted will do the job fine
After downloading the image from the RaspberryPi use the appropriate software above to "burn" the image to the card. On windows software for example make note of the drive letter, format and transfer the image. Follow instructions for each software as appropriate. This part is very easy for an average PC users.
Above is a Raspberry Pi 3 with and without a heatsink. Below is the bottom of the Raspberry Pi 3. I decided to show this as there are very few photos of this on the internet. I was also curious until I got one!
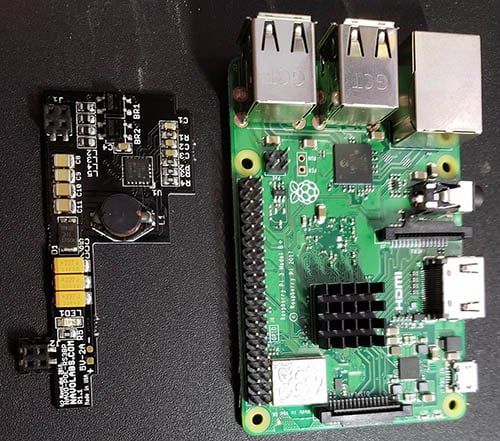
Below is the POE (Power over Ethernet) disconnected from the Raspberry Pi for a better look. This is optional and frankly if used on your desktop, not needed.
So I assume now you plugged everything in, inserted the SD Card and the unit is booting up. Here are the next few things to do BEFORE you start playing around with the unit further. Please note the $ indicates a terminal prompt.
- Change Password! The Default password for the RaspberryPi is raspberry username is pi. Needless to say, this has to go! $ passwd
- If for some reason you are in terminal mode and want to start the GUI (Graphical User Interface) type startx
- Connect to a Network. If using Ethernet, plug in and you are done. For Wireless, using the GUI look for the wireless icon and enter credentials.
- Perform Updates: $ sudo apt-get update
- Perform Upgrades:$ sudo apt-get upgrade
- Update the RaspberryPi Firmware: $ sudo apt-get install rpi-update
Here are some other useful things to know to get you started. Not the items in <brackets> are variable and you do not type the brackets. This would be a program name or names for example. You can do more then one at the time. The term sudo is "super user do" which is comparable to running something as an administrator in windows.
- To install programs: $ sudo apt-get install <Program>
- To uninstall programs: $ sudo apt-get remove <Program>
- To run the configuration untility: $ sudo raspi-config
- To switch to Administrator: $ sudo
- To add a user $ adduser <Name>
- To shutdown: $ sudo shutdown -h now
- To Reboot: $ sudo reboot -h now
If you made it this far then in all likelihood you are ready to start having some fun and get some ham radio software installed and get on the air! Continue on to the Ham Radio projects and applications page of this website.
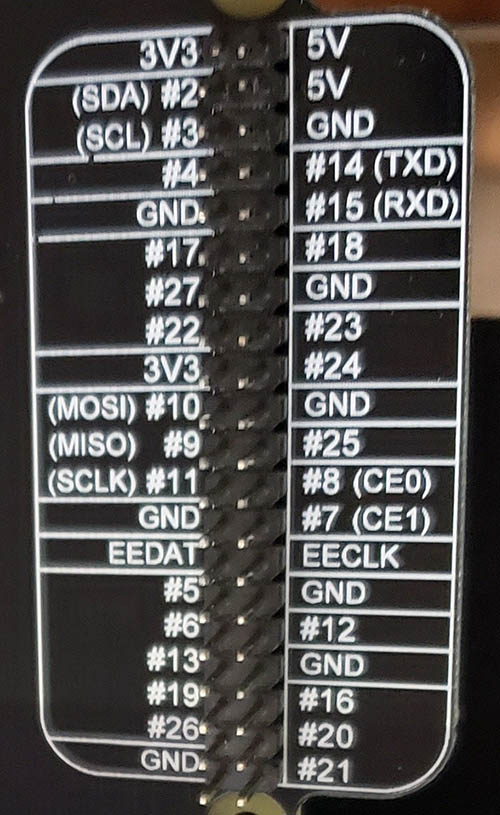
Above shows the endless possible things one can connect to the pi family. This happens to be the labels on the breakout box but it is exactly the same on the Pi it was used with.
In addition to this website of course, here are some other great places to find more information on the Raspberry Pi and related items:
- AdaFruit
- List of Ham Radio Applications for the RaspberryPi
- MagPi Magazine with a tone of great information
- ModMyPi
- Raspberrypi.org The Official site
- Raspberry Connect
- FlightAware PiAware setup instructions
- NooElec Store for alternative SDRs
- SparkFun
Please be sure to bookmark them as well as bookmark W6AER.COM if you find it useful!
There is a huge list of Ham Related Projects you can build with your Raspberry Pi, Including a small, inexpensive unit to run your station, example below.
Front and Back of the enclosure. This allows massive expansion, a full-sized hard drive as well as many other features.
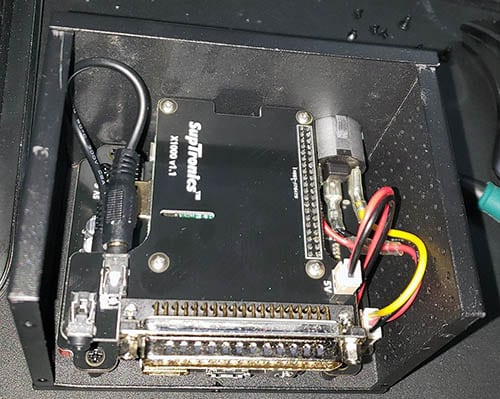
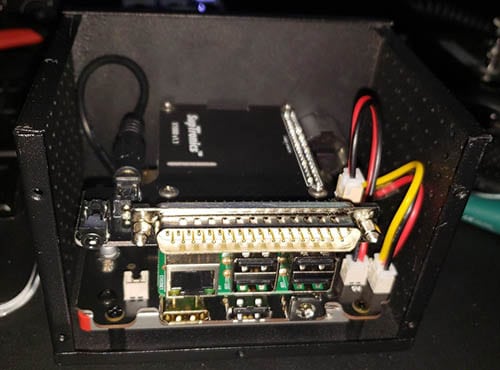
The Break-out box behind the unit allows for experimenting with the Raspberry Pi without having to take the box apart. The 128Gb solid State Hard Drive, sits at the bottom of the unit. There is also routing for audio as well as other things as needed. This changes from box to box.
I really hope this helps someone and if you have any questions or suggestions, please feel free to reach out to me!
If you find something incorrect, have an update, or if there is something you would like to see added to the site, drop me a line here. I like to keep things as up-to-date and as accurate as possible. Thank you! - Lucas / W6AER


